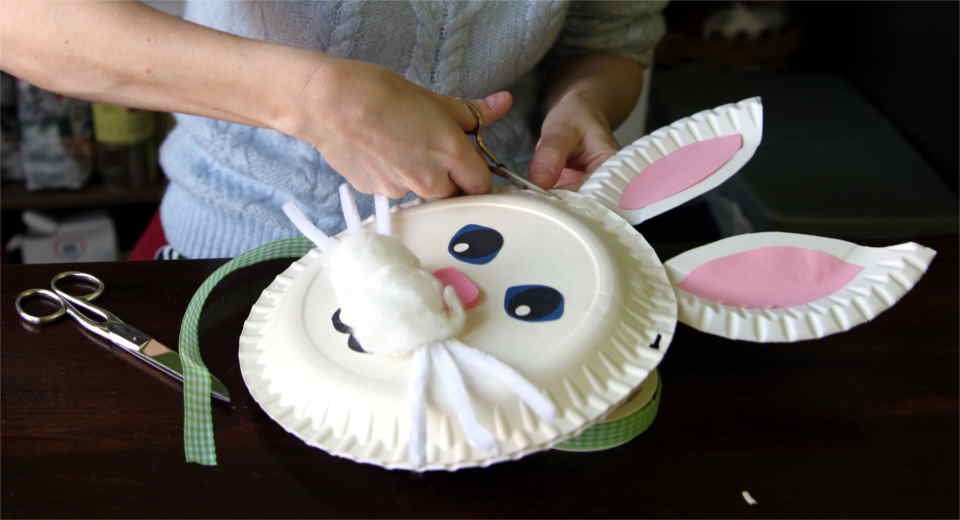
This easter DIY shows you how to make a easter bunny bag that can be used by the child for egg hunts, as an Easter nest to hang up or as a decoration for the children’s room. A cute idea for Easter crafts with children that is also practical.
Crafting encourages children’s creativity and there is nothing better before Easter than blowing out eggs and making Easter decorations together. The best ideas for Easter crafts with children are Easter decorations that the child can also play with at the same time.
This year for Easter, we made an Easter bunny bag to wear around your neck out of two paper plates, cotton wool, clay paper and wrapping ribbon. Before Easter it makes a nice wall decoration and at Easter we want to use it as an Easter bag when hunting for Easter eggs and hang it on the wall as an Easter nest.
Tip: Cuddly Pompom Easter Bunnies and a fluffy pompon easter-lamb, easter-bunny-egg-cups and pretty Easter nests made of wool – also check out our latest DIY ideas for Easter crafts with kids, your partner or at least a friend!
How to Make a Easter Bunny Bag and What You Need for Crafting

Material List*
- 3 Cardboard plate (23 cm diameter)*
- 2 Pipe cleaners
- clay paper (black, blue, pink)
- pink felt (alternatively clay paper)
- Craft glue
- stapler
- Punch
- Fabric gift ribbon with spring motifs
- Wadding
How to Make an Easter Bunny Bag

1. Cut Out the Head and Ears
First, draw a round semicircle on the right and left sides of a paper plate and cut out the two ears. Cut out about a third of the second paper plate in a crescent shape for the pocket opening.
Tip: The easiest way to do this is to lay another paper plate on its side and trace around its edge with a pencil and draw a cutting line on the lower paper plate.
On pink cardboard, cut out the inside of each ear in the shape of a leaf and glue it onto the two ears.
2. Glue and Staple the Bag
Now glue the ears to the back of the whole paper plate. We attached the third paper plate in the shape of a half moon all around with craft glue and added some staples at the end for extra stability.
3. Making the Bunny Face
For the bunny face, you will need clay paper, two cotton wools, pipe cleaners and pink felt (or you can also use pink clay paper for the sniffing nose).
First draw the eye and the pupil on dark blue and black paper, cut them out and glue them together. Use the hole punch to cut out two circles from the rest of the paper plate and glue them onto the pupil.
Cut out the nose from the pink felt and draw a 3 on the black cardboard and cut it out – it will be the Easter bunny’s mouth.
Now roll two cotton wools between your hands until they are round and cut two pipe cleaners into 3 pieces of the same length.
First glue on the eyes and the pink nose. Then glue the two cotton wools on top and the snout underneath.
Finally, glue on the pipe cleaners as whiskers.
4. Ribbon to Hang Up the Easter Bunny Bag
Finally, punch two holes next to the ears with the hole punch and cut a line as thick as your ribbon with the scissors. Thread the fabric ribbon on both sides to the desired length and glue it to the back.
On Greatime you will find many more Easter ideas, craft ideas and many other activities with children, your partner or friends. And if you like our ideas and don’t want to miss any more, just like and follow us on Facebook and Instagram! 🙂
*Affiliate links: If you order a product from amazon via this link, we receive a small commission without it becoming more expensive for you.


![Uber En Quot Diaper Cake Quot De Quot Windeltorte Quot [Uber En="How*to*make*diaper*cake*yourself" De="Anleitung*zum*Windeltorte*selber*machen"]](https://greatime.de/wp-content/uploads/2024/01/windeltorte.jpg)
![Uber En Quot Birthday Candle Card Quot De Quot Geburtstagskarte Mit Kerzen Quot [Uber En="Instructions*for*making*a*birthday*candle*card" De="Anleitung*zum*Nachbasteln*von*einer*Geburtstagskarte*mit*Kerzen"]](https://greatime.de/wp-content/uploads/2020/05/geburtstagskarte-diy.jpg)
![Uber En Quot Christmas Tree Card Quot De Quot Weihnachtskarte Quot [Uber En="How*to*make*a*Christmas*tree*card*with*fir*tree*to*fold*out" De="Schöne*Weihnachtskarte*mit*Tannenbaum*zum*aufklappen"]](https://greatime.de/wp-content/uploads/2021/12/schoene-weihnachtskarte-basteln-tannenbaum.jpg)