Every year again in the house the beautiful pumpkins mold far too quickly. High time for a nice DIY autumn project! Because with a simple trick you can easily make a beautiful paper mache pumpkin. Learn how here!
Pumpkins are simply my favorite decoration for autumn! Their bright colors bring autumn into the house and let the late summer still lingers. Outside in the window they keep quite well, but inside in the apartment I despair every year. It’s the heat from the heating system that causes the pumpkins to mold and rot far too quickly. On the windowsills directly above the radiators would also be the most beautiful places and that is with real pumpkins unfortunately the worst idea that can come to mind. 😀
The solution: With the help of a balloon, you can make a surprisingly real-looking pumpkin out of paper mache. It’s so easy and you only handle non-toxic eco-friendly materials, so you can craft these DIY pumpkins with little kids without worry. Simply afterwards still paint or cut a black face and you can also tinker a Halloween pumpkin or a jack-o-lantern. For the jack-o’-lantern, however, I would advise putting an artificial tea light in the papier mache pumpkin you’ve made. You can find all the materials you need for crafting on the materials list*.
Want more creative inspiration for fall? On Greatime you’ll find instructions for making Halloween lanterns out of tin cans, Halloween candle holder and lots of ghoulishly beautiful Halloween ideas!
Decorative Pumpkin Craft From Paper Mache

Paper mache is probably the easiest and cheapest material for modeling decorative items that there is. So you won’t find cheaper decorative pumpkins than your homemade pumpkins made of papier mache in any store.
Duration: about 1 hour per pumpkin + 1-2 days drying time
Materialliste
- Natural rubber balloons
- string
- masking tape
- Newspaper or wrapping paper
- wall paper paste, paste without solvents or homemade paste (see below for instructions)
- Acrylic paints
- White emulsion paint (normal wall paint, alternatively white acrylic paint)
- brush with mixing palette
How to Make Your Own Paste
For the paper mache you need newspaper shreds and paste. Either you buy wallpaper paste or you make the paste yourself. To make it, mix 0.5 liters of water with 150 grams of flour in a saucepan until there are no more lumps and boil the mixture briefly. The result is a viscous mass; if it is too thin, simply add some more flour. Now the environmentally friendly paste just needs to cool, you fill it into an empty sealable jar and put it in the fridge. It will keep for about two weeks.
Ingredients
- 1/2 liters of water
- 150 grams of flour
- Small saucepan
- Whisk
- Jar with screw cap
The Balloon Becomes a Pumpkin

Burst the balloon once, then let enough air escape to deform the rubber a bit and knot the end. Now knot one end of the twine around the balloon tail and wrap the twine tightly around the balloon so that it presses in. I wrapped the twine around the balloon a total of 4 times. This way the pumpkin consists of eight bulges. Each time the twine was nice and tight, I secured it with two strips of masking tape so the twine wouldn’t slip. At the end, I simply tied the string tightly to the balloon tail.While I already made sure to tie reasonably regularly. But if some bulges are a little larger than others, it just makes for a natural look!
Tip: When crafting with kids, it’s best to use locking clips for the balloon. Once it is wrapped with the string, you can loosen the clip and inflate it carefully further, so that the balloon gets pumpkin shape. This way the kids won’t despair of pulling the string tight and fixing it 😉
Crafting the Pumpkin From Paper Mache

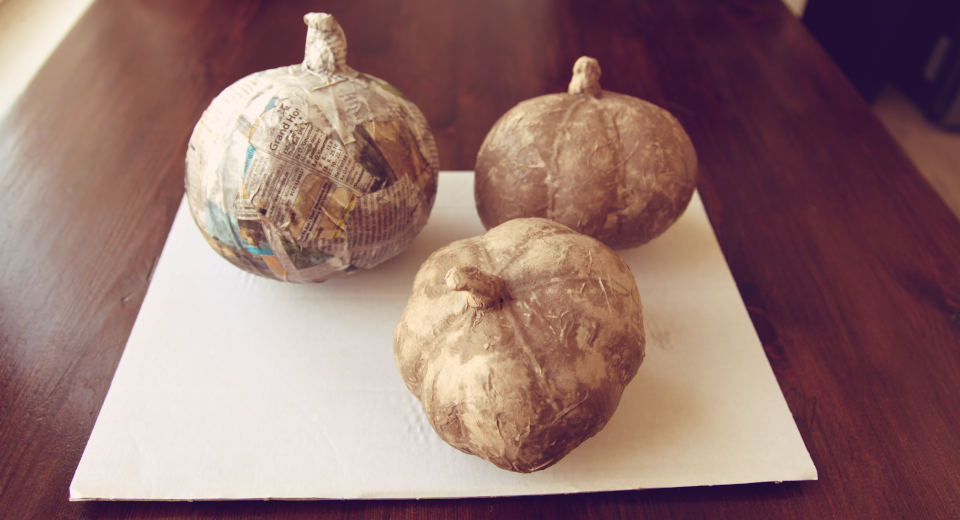
Tear newspaper or wrapping paper into small shreds, spread paste on the balloon and glue the shreds all around until the entire pumpkin is covered with 3 layers of paper mache. In the center at the bottom of the pumpkin, I rolled a small ball of newspaper and glued it on. For the stem, just wrap the balloon tail with paper mache and work out the shape.
Place the pumpkin on a cardboard backing or craft mat to dry. It will stick to newspaper. Let it dry thoroughly for at least a day until the paper mache is completely hardened.
Paint Paper Mache Pumpkin

Now apply white emulsion paint as a primer and let the white pumpkins dry.
I then painted three different variations of pumpkins. Whether you paint your paper mache pumpkin naturalistic in orange and yellow like me or modern in metallic or white is a matter of taste.
Have fun making decorative pumpkins out of paper mache!

What autumn activities can’t you miss? Indoor and outdoor, you’ll find colorful ideas for activities with friends, activities with kids and undertakings with your partner on our leisure ideas portal. Check it out.
Do you like Greatime and want to stay up to date? Then like our page at Facebook or Instagram! 🙂
*In this post you’ll find some so-called affiliate links. This means that when you buy a product through such a link, Adventure Friendship may receive a small commission without making the product more expensive.


![Uber En Quot Halloween Decoration Quot De Quot Halloween Deko Quot [Uber En="You*can*make*Halloween*candle*holders*from*empty*bottles" De="Aus*leeren*Flaschen*kann*man*Halloween-Deko*basteln"]](https://greatime.de/wp-content/uploads/2018/10/halloween-deko-basteln-kerzenstaender.jpg)
![Uber En Quot Diy Easter Basket Quot De Quot Diy Osterk Rbchen Quot [Uber En="This*is*how*to*make*a*DIY*Easter*basket*from*yarn*and*cornflour" De="Osterkörbchen*basteln*aus*Garn*und*Speisestärke"]](https://greatime.de/wp-content/uploads/2018/03/osterkoerbchen-basteln-aus-garn-speisestaerke.jpg)
![Uber En Quot Halloween Scavenger Hunt Quot De Quot Halloween Schnitzeljagd F R Kinder Quot [Uber En="Halloween*scavenger*hunt*for*children*with*spooky*surprise*and*game*stations" De="Halloween*Schnitzeljagd*für*Kinder*mit*gruseliger*Überraschung*und*Spielstationen"]](https://greatime.de/wp-content/uploads/2017/10/halloween-schatzsuche-schnitzeljagd-nachts.jpg)